Table of ContentsHow To Adjust A Garage DoorYour Garage Door Spring Is Not A DIY ProjectGarage Door Spring Adjustment: How To Adjust & TightenGarage Door Spring Adjustment: Signs You Need RepairsGarage Door Springs & ProblemsHow To Adjust The Garage Door Spring
 What To Do When Your Garage Door Springs Go Bad
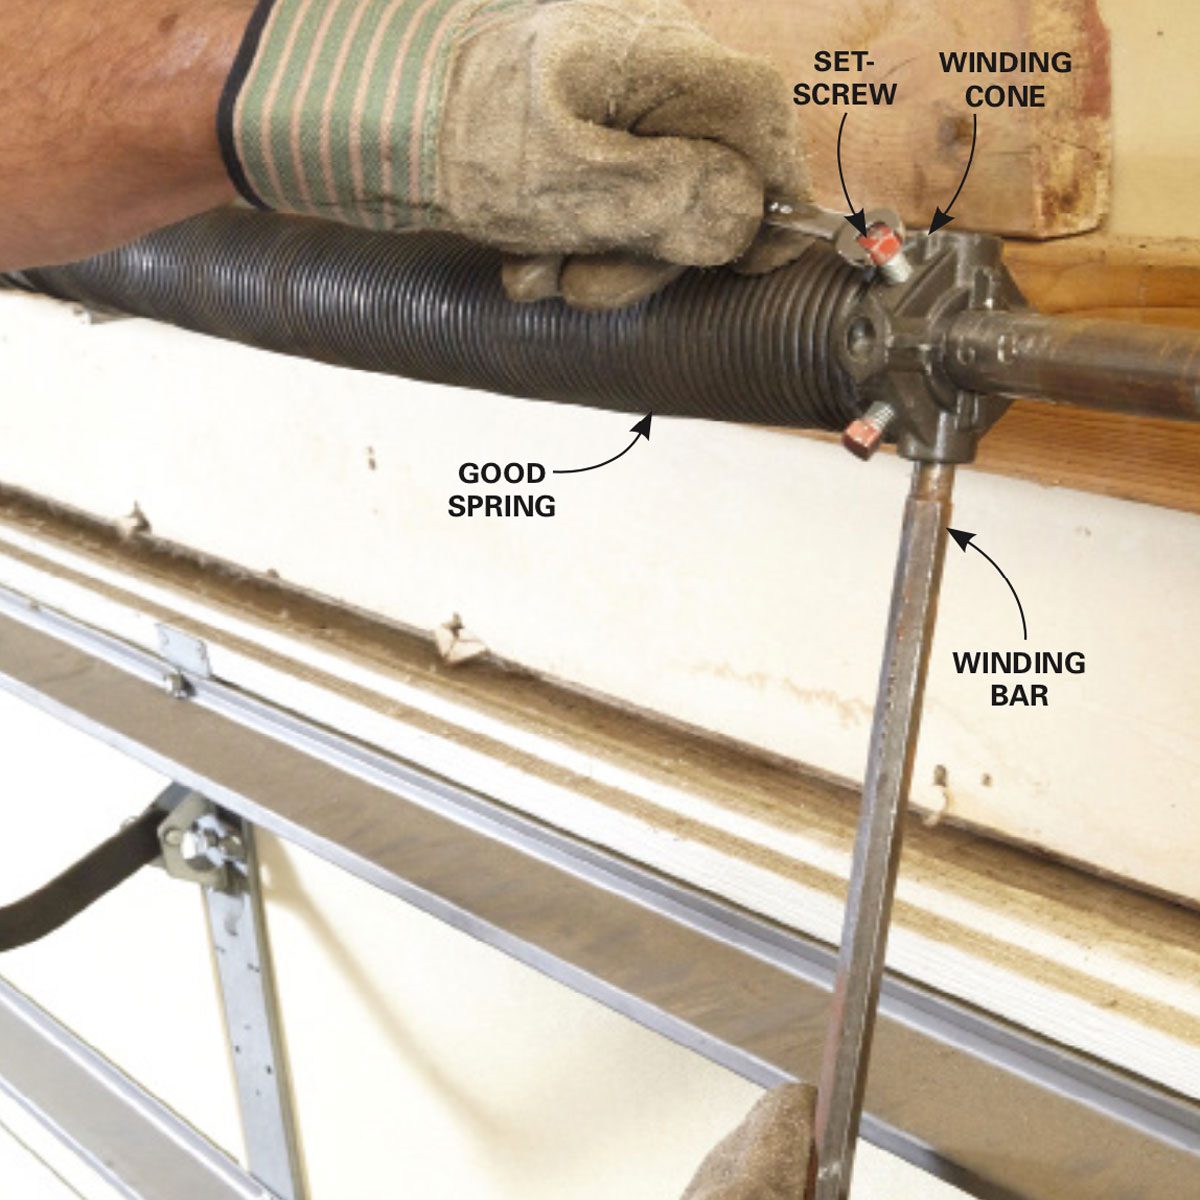
It should be less than an inch and a half. If it is over 2" either get another person to alter your springs or have somebody make some bars that will effectively fit the cones. 6. 5 A typical issue with DIYers replacing their torsion springs is that the winding bars often are not placed entirely into the winding cones.
Initially, place the bar into the winding cone and tape the bar as visualized. 6. 6 Taping the ends of both winding bars as visualized will let you plainly see simply how far your bars are permeating the holes in the winding cones as you loosen up the old springs and rewind the brand-new ones.
 Garage Door Springs Need To Know Info
7 It's now time to unwind the spring. Firmly position yourself on a constant ladder beside the garage door. Next, place the bar into one of the holes of the winding cone. Make sure it goes all the way in. It must click when your bar strikes the core. If you wish to check the force you will be dealing with before loosening up the set screws, rise on the bar one quarter turn and bring it back down.
Garage Door Springs & Problems
Be prepared for the torque to be transferred to the bar. 6. 8 Correctly tightened screws will loosen with less than a turn. When you loosen a set screw, keep at least one bar in the cone WHATSOEVER TIMES until the spring is fully unwound. Lots of cones have actually been over-tightened.
 Professional Garage Door Spring Repair
You might require to totally eliminate the set screws. The shaft might be distorted and the cone still might not unwind at all. 6. 9 KEEP A BAR IN THE CONE WHATSOEVER TIMES! If you have eliminated the set screws and the spring still will not unwind, pull down on the bar, however be gotten ready for the cone to loosen anytime.
10 If the garage door comes off the flooring when you take down on the bar, and if the cone still won't loosen up, tap the bar beside the cone with a hammer to require the cone beyond the swollen part of shaft. Preserve a firm grip on the bar; keep it strongly placed completely into the cone; and be prepared at all times for the cone to slip, break, explode or break devoid of the shaft and tug the bar down.
Adjusting Garage Door Springs
11 When the cone is devoid of the shaft, lower the bar and let it rest upon the top of the garage door. 6. 12 Insert a second bar into the next hole. With one bar in each hand, raise completion of the second bar enough to pull the first bar out of the cone.
13 Lower the https://messiahafqn516.wordpress.com/2020/10/18/how-to-adjust-a-garage-door/ second bar to the top of the garage door as you did the very first bar. If your shaft is distorted inside the cone, you might need to tap the bar with a hammer as you relax the spring. garage door panel prices Maintain a company grip on the bar; keep it securely placed completely into the cone; and be prepared at all times for the cone to slip, break, take off or snap loose from the shaft and jolt the bar down.
14 Repeat these 2 steps till the spring is entirely unwound. 6. 15 Unwind other spring if garage door installation time it is still wound and is not broken 8. 1 It is now time to replace the garage door springs. To start, move the drum away from the bearing plate. 8. 2 File this end of the shaft as needed.
Garage Door Springs Need To Know Info
If it doesn't move, attempt moving it to the right. If required tap the beyond the headplate with a hammer while pulling the shaft to the right until the shaft slides through the bearing. 8. 3 Go the opposite of the garage door and pull the shaft out of the headplate if it has not currently moved out.
4 File the shaft more if required. The cable television drum and spring will not slide off if the shaft is rough. 8. 5 Check the bearing. Lube it with motor oil, spray lithium, or spray lubriplate grease. Do not utilize WD-40. If the shaft is used and the bearing is seized and you can't free it, replace the bearing.
I find very couple of other bearings that require to be changed. Nevertheless, if you do need to replace the bearing and you do not have a new one, you can replace it at a later date. You'll find a fast way to do this at our End Bearing Plate Replacement guideline page.
Common Garage Door Spring Problems
6 Eliminate the left cable television drum. 8. 7 Slide off the old spring. If you are believing of reusing your cones, read our Torsion Spring Cone Replacement tutorial. 8. 8 Location the old springs in a trash bin and far from your work location in your garage. My worst ladder mishap occurred when I stepped off my two-foot ladder onto a spring and sprained my ankle.
9 Slide on the new spring. The cone with the larger hole is the stationary end. It goes on first. You will have to move the winding cone end over the end of the shaft. 8. 10 Double-check to ensure you have the proper wind on your new torsion spring.
Notification, also, that the cone is red which normally designates ideal wind. Clients often call and explain that when they get about six turns on the springs they spin on the cones. This is because of setting up the springs on the incorrect sides of the center bracket. 8. 11 Slide the spring to the spring anchor bracket focused above the garage door.
How To Replace Garage Door Torsion Springs
I do it, and the majority of garage door installers do it as a basic installation rule to enable flexibility in opener installation. 8. 12 Reinstall the cable television drum and move the shaft into the bearing. 8. 13 Follow the very same procedure for the other side. Pull the end of the shaft through the bearing and get rid of the drum.